Face Mask

Face Mask

Tuesday, August 4, 2020

Here Are All the Virtual Workshops Muji Canada is Hosting This Month

Last month, Muji hosted a series of virtual workshops offering tutorials from Canadian experts on varied topics like matcha lattes, calligraphy and floral arrangements. Designed in order to help audiences undertake inspiring and creative projects at home during quarantine, the Japanese retailer’s August slate of workshops includes watercolour botanicals, a bullet journaling tutorial and more.

Read on for the full lineup of virtual workshops, which will be hosted by Muji over Zoom. The workshops are free, but online registration is mandatory.

Introduction to Japanese Teas
Pedro Villalon of Vancouver’s O5 Rare Tea and Kombucha Bar returns this month to take viewers through the basics of Japanese tea. Touching on the handcrafting process, origin and flavour profile of three classic teas—a beautiful gyokuro from Yame, a bright green sencha from Kirishima, and a heartwarming, micro-milled hojicha—the workshop will also include a simple recipe that can easily be recreated at home. Details here. August 5, 7pm EST/4pm PST

Watercolour Botanicals Workshop
Learn how to use Muji brush pens with a paintbrush to create watercolour-effect botanicals, with the guidance of Vancouver-based lettering artist Alissa of @feistandflourish. In this one-hour beginner workshop, you’ll learn to create a variety of florals and foliage and assemble them together in beautiful watercolour wreaths. Details here. August 12, 7pm EST/4pm PST

Workspace Organization Konmari Workshop
Take tips from Randeep St. Jacques of ClutterLess Living on how to create a functional and clutter-less space for school-aged children at home. The workshop will touch on the key must-have items for homework areas for kids of all ages, and will also include tips on how to create an efficient home office to boost productivity and minimize distractions. Details here. August 22, 1pm EST/10am PST

Autumn-Inspired Bullet Journal Spread Workshop
Plan an autumn-themed bullet journal spread with the help of Edmonton-based bullet journaling artist Kelly of @withkx. The workshop starts with a fall-inspired theme of leaves and mushrooms with an embroidery hoop motif, and will help viewers create a September cover and monthly spread for their journal. Details here. August 26, 7pm EST/4pm PST

Houseplant Rescue Workshop
Let’s face it: our houseplants are never not in need of some serious TLC. Get the lowdown on how to properly care for them with the help of Matt Stata, a plant scientist and urban gardener at the University of Toronto. Learn how to revive dying plants and deal with common problems like over- or under-watering, light or nutrient deficiencies, and pests. You’ll also have a chance to ask your own plant care questions in this hour-long webinar. Details here. August 29, 2pm EST/11am PST

The post Here Are All the Virtual Workshops Muji Canada is Hosting This Month appeared first on FASHION Magazine.


from FASHION Magazine https://ift.tt/2XtIb0N
via babu31blog

TOP FASHION LOOKS FROM F.R.I.E.N.D.S

The current life in Quarantine has given me quality time to reflect on myself, go back to some long-forgotten hobbies, and try new ones too. Some days we are just swamped up with the 9-5 routine and all you want to do post this is make you a good meal and chill. Just like my […]

The post TOP FASHION LOOKS FROM F.R.I.E.N.D.S appeared first on Hautelist.


from Hautelist https://ift.tt/3gEI5ec
via babu31

If You're Avoiding Sugar and Craving Brownies, Try This 5-Ingredient Vegan Recipe

I'm in quite a tough spot because I love to bake, but my body doesn't handle sugar well. I get bloated, my face breaks out, I feel moody, I don't sleep well, and when I eat it, my cravings are so bad that I can't stop thinking about it. Oh, but it tastes so damn good!

I try to eat sugar only occasionally, but I always end up eating so much that my belly aches. So over the past couple of years, I've learned to adapt my recipes to omit added sugar, like these sugar-free date cookies and these fruit-sweetened muffins, and now, I have this added-sugar-free brownie recipe.

Made with just five ingredients - rolled oats, ripe banana, almond butter, cocoa powder, and chopped walnuts - these brownies have that soft, chewy texture I crave and that sweet, chocolaty flavour. These don't taste as sweet as regular sugar-filled brownies, but they're sweet enough for me!

These brownies are not only free of added sugars, but they're also gluten-free, vegan, and oil-free. They taste amazing served with this easy, five-minute banana-berry nice cream or topped with crunchy peanut butter and a sprinkling of cacao nibs.

This recipe is a delicious reason to buy an extra bunch of bananas. I like to meal prep a batch on Sunday so I have a healthy treat to enjoy after dinner that I know will make me feel good. They freeze well, too, so you can take one out at a time, warm it up in the microwave, and dessert is served!

Sugar-Free Brownies

From Jenny Sugar, POPSUGAR Fitness

Ingredients

  1. 1 1/2 cups rolled oats
    3 ripe bananas
    1/2 cup creamy almond butter (salted)
    1/4 cup unsweetened cocoa powder
    2 tablespoons chopped walnuts (or other nut)

Directions

  1. Preheat oven to 350°F, and lightly oil a 7x11-inch pan.
  2. Add oats to a food processor, and grind into flour.
  3. Add the bananas, almond butter, and cocoa powder, and mix until a smooth batter forms.
  4. Spread the batter evenly into the pan using a spatula and top with chopped walnuts.
  5. Bake for 15 minutes or until a toothpick inserted comes out clean.
  6. Cool slightly before cutting into eight squares. Enjoy! Store leftovers in an airtight container or freeze.

Here's the nutritional information for one brownie:

Nutrition

Calories per serving
99


from POPSUGAR Health & Fitness https://ift.tt/39VN9IJ
via babu31

Easy Keto Crunch Bars

Easy no bake low carb bars with a truly crispy crunch! These Keto Chocolate Crunch Bars are a one-of-a-kind treat. The keto ingredient landscape is truly changing faster than you can bat an eye. It’s really quite mind-blowing! And for this baking obsessed gal, I can hardly tell you what a boon it is, all...

from All Day I Dream About Food https://ift.tt/3guENu5
via babu31

Wide-Arm Push-ups Are Tough - But These Alignment Tips Will Help You Improve


I have been ignoring wide-arm push-ups for years - due to the (false) assumption that this particular hand positioning was ineffective.

So, when my workout instructor randomly called out wide-arm push-ups the other day, I admittedly had no idea if I was performing the challenging variation the correct way. If anything, the tenseness I felt in my upper body was signaling no.

Looking for more general info on the move (the pros, the cons), I reached out to NASM-certified personal trainer Kara Liotta.

First, let's dissect the differences between wide-arm push-ups and narrow push-ups - which Liotta says are the two main hand positions in a push-up. "A wide push-up means that you set up with your hands wider than shoulder-width apart," Liotta explains. "A narrow push-up means that you set up with your hands much closer together and slightly closer than shoulder-width."

Much to my surprise, Liotta says one position isn't better than the other, but thanks to differences in form and alignment, each push-up position targets different areas of the upper body. For example, wide-arm push-ups focus on the chest and anterior deltoids, while narrow push-ups target the chest, too, but focus more on the triceps.

While I was hyperfocussed on where my hands were placed, Liotta says what's really important in each variation - in order to avoid injuries and unnecessary pressure on your shoulder joints - is to focus on the proper shoulder position.

"In a narrow push-up, your shoulder blades can hug together in a retracted position. But, in a wide push-up, your shoulder blades should actually slightly wing outward, so your elbows flare out at a back diagonal," Liotta says.

Wide-arm push-ups are often performed incorrectly, and therefore pressure is placed on the shoulder joints - according to Liotta, that's actually why some struggle with executing them. "It is important to remember that the alignment of your shoulder blades should be different than in a narrow push-up. Think, 'wide push-up, wide shoulder blades.' This allows space for your shoulders to function properly."

Liotta personally prefers wide-arm push-ups to narrow "because it feels easier for me to keep unnecessary pressure out of my shoulders." And as long as you maintain control in your core and focus on slightly opening your shoulder blades, Liotta notes they can be a fantastic exercise for building strength in your upper body.

But mastering push-up form takes time, so always take modifications when you need them! Liotta suggests placing your shins down in a modified plank position. "Just remember that your hips must still be low and supported by your core, instead of turning it into a tabletop position."

Click here for more health and wellness stories, tips, and news.


from POPSUGAR Health & Fitness https://ift.tt/31m8cQK
via babu31

Slow Cooker Korean Beef

Amazing and flavorful beef that slow cooks to tender melt in your mouth perfection! This will be one of the best meals that you will make!

When I started to do some research on a Korean Beef recipe, I found that the recipes are pretty similar to this Korean Ground Beef and Rice BowlsSlow Cooker Mongolian Beef or Korean Ground Beef Stir Fry.  What they have in common is unbelievably flavorful beef that is quick and easy to make and enjoy!

Korean beef over rice in a bowl with two black chopsticks.

Slow Cooker Korean Beef

Slow Cooker Korean Beef first posted when my youngest sister had just left for college in Korea. We had a fun little going away party for her where I served this Korean beef and it was amazing! The flavors were out of this world and it was a huge hit at the party.  As soon as it came out of the slow cooker we couldn’t stop eating it. The flavor is absolute perfection.

Cooking the flank steak low and slow made it so tender.  The sweet and spicy sauce soaked into the meat and made every bite explode with flavor!  This recipe instantly became a favorite here on the blog and in my family. It was definitely one of the best things that I have ever had!  No wonder it quickly became so popular!

Ingredients for Korean Beef:

The ingredients in this slow cooker beef come together so well and you are going to love the flavor of this beef. It thickens up as it cooks and coats the chicken perfectly. Top with some sesame seeds and green onions and you will have a meal that you will make again and again!

  • Flank Steak: Cut in thin slices against the grain to make it tender and juicy.
  • Cornstarch: To thicken the sauce.
  • Sesame Oil: Great Asian flavor and it will help other flavors soak into the beef.
  • Garlic Cloves: Minced, these will give right flavor to the sauce.
  • Soy Sauce: Adds a rich sweet and savory flavor.
  • Beef broth: Liquid to cook the beef and adds a bit of flavor.
  • Brown Sugar: Sweetness to balance out the other savory and spicy notes.
  • Onion chopped: Adds moisture and deep flavor.
  • Red pepper flakes: Add at the end of the cook time for a less spicy version. The red pepper spice will get stronger as it cooks.
  • Garnish: Sesame seeds and green onions

How to Slow Cook Korean Beef:

This melt in your mouth tender beef takes only minutes to get started in a slow cooker.  Simply cut your steak into strips, fill your crock pot with all the ingredients, and sit back and enjoy the delicious smell of dinner cooking!

  1. Prepare flank steak: Cut flank steak into thin strips. In a ziplock bag add flank steak pieces and cornstarch. Shake to coat.
  2. Combine ingredients in slow cooker: Add sesame oil, minced garlic, soy sauce, beef broth, brown sugar, onion, and red pepper flakes to the slow cooker. Stir ingredients. Add coated flank steak and stir again until coated in the sauce.
  3. Cook for high 2-3 hours or on low 4-5 hours until cooked throughout and tender.
  4. Serve: Plate flank steak over rice and garnish with green onions.

Korean beef meat in the slow cooker being stirred with a wooden spoon.

Tips for the Most Tender Beef:

I love cooking beef in the slow cooker because it cooks the meat so well. It is one of my favorite ways to cook it.  The juicy beef gets so tender it falls apart in your mouth. That’s great news for a meat that can sometimes turn tough and dry when it cooks!  Here are my expert tips to make this the best Korean beef you have ever made!

  • Slicing flank steak: The easiest way to slice your beef is to cut it when it is very cold.  Cut against the grain.
  • Variations: Add broccoli in at the end of the cook time for a nice crunch.  Or add it in about halfway through cook time for softer brocccoli.
  • Serving ideas: Serving with rice is a classic favorite.  However, if you are watching your carbs you may want to try cauliflower rice or zucchini noodles instead.  Add a colorful Asian Salad for a complete meal.

Storing Slow Cooker Beef:

After buying flank steak at the store you can refrigerate it for 3-5 days.  If you are not ready to cook this delicious recipe right away you will want to freeze it until you are ready to cook it.  Before freezing it, place extra airtight wrap around the store bought packaging to reduce freezer burn.  The uncooked meat can stay frozen for 6-12 months.

Once you have cooked your perfect slow cooker beef, you will not want to miss the delicious leftovers!  Eat them within 4 days if you are storing it in the refrigerator or 3 months if you decide to freeze your leftovers.

Korean beef in a bowl with black chopsticks.

 More Amazing Slow Cooker Beef Recipes:

Print

Slow Cooker Korean Beef

Amazing and flavorful beef that slow cooks to tender melt in your mouth perfection! This will be one of the best meals that you will make!
Course Dinner, Main Course
Cuisine American, Asian American
Keyword korean beef, slow cooker korean beef
Prep Time 10 minutes
Cook Time 4 hours
Total Time 4 hours 10 minutes
Servings 6 Servings
Calories 338kcal
Author Alyssa Rivers

Ingredients

  • 1 ½ pounds Flank Steak
  • ¼ cups cornstarch
  • 2 tablespoons Sesame Oil
  • ½ teaspoons mince Garlic Cloves
  • 1/2 cups Soy Sauce
  • 1/2 cup beef broth
  • ¾ cups Brown Sugar
  • 1/4 cup onion chopped
  • 1/4 teaspoon red pepper flakes
  • sesame seeds and green onions for garnish

Instructions

  • Cut flank steak into thin strips. In a ziplock bag add flank steak pieces and cornstarch. Shake to coat.
  • Add sesame oil, minced garlic, soy sauce, beef broth, brown sugar, onion, and red pepper flakes to the slow cooker. Stir ingredients. Add coated flank steak and stir again until coated in the sauce.
  • Cook for high 2-3 hours or on low 4-5 hours until cooked throughout and tender. Can serve over rice and garnish with green onions.

Notes

Updated on August 5, 2020
Originally Posted on October 19, 2015

Nutrition

Calories: 338kcal | Carbohydrates: 34g | Protein: 27g | Fat: 10g | Saturated Fat: 3g | Cholesterol: 68mg | Sodium: 1224mg | Potassium: 485mg | Fiber: 1g | Sugar: 27g | Vitamin A: 25IU | Vitamin C: 1mg | Calcium: 51mg | Iron: 2mg


from The Recipe Critic https://ift.tt/30p2fmV
via babu31blog

Demystifying The Carnivore Diet: What’s The Problem With Plants & Is An All-Meat Diet The Answer?

Have you noticed that every other week a new diet seems to materialize, seemingly out of nowhere, in the health

The post Demystifying The Carnivore Diet: What’s The Problem With Plants & Is An All-Meat Diet The Answer? appeared first on Ben Greenfield Fitness - Diet, Fat Loss and Performance Advice.


from Ben Greenfield Fitness – Diet, Fat Loss and Performance Advice https://ift.tt/3gtyBT1
via babu31

Next steps for embedding cultural safety

The new Closing the Gap agreement between Australian governments and the Coalition of Peaks identifies the need to address institutional racism, discrimination and unconscious bias and to embed cultural safety within government mainstream institutions and agencies. In the article below, Professor Juanita Sherwood, Pro Vice-Chancellor of Indigenous Engagement at Charles […]

from Croakey https://ift.tt/3k6SC45
via babu31

Mental health needs more than more Medicare sessions

(Introduction by Croakey) Earlier this week the Federal Government announced it is providing 10 additional Medicare-subsidised psychological therapy sessions for Australians affected by the second wave of the COVID-19 pandemic. The additional sessions are for people who have already used their initial 10 sessions through a Mental Health Treatment Plan, […]

from Croakey https://ift.tt/2Dtikz0
via babu31

Improving the care of people with head and neck cancer: new video series

Five priority areas to improve the treatment and lives of people with head and neck cancers are highlighted in a unique new video series, reports journalist and cancer survivor Julie McCrossin. The videos also share the stories and questions of survivors, and “tell the blunt truth about how the Australian […]

from Croakey https://ift.tt/3i5WP6u
via babu31

Lifting The Lid On CBD Oil – What It Is And How To Use It

The first time I heard of CBD oil was way back when I was a teenager. Growing up in the … Read More

The post Lifting The Lid On CBD Oil – What It Is And How To Use It appeared first on Amazon Warrior by Caroline Bakker.


from Amazon Warrior by Caroline Bakker https://ift.tt/33o9DAX
via babu31

I Didn't Realise the Impact My Sneakers Were Having on My Run Until I Road-Tested This Pair

A little over a month ago, I agreed to start run training with Nike's Head Run Coach, Lydia O'Donnell, in the hopes of improving my 5km run speed and putting Nike's new Air Zoom Pegasus 37s sneakers to the test.

Before I started, Lydia explained that when you're looking to improve your speed, you need to train and treat your body differently. It's important to create a sustainable running program to help create healthy running habits that gradually increase your speed over time. If you start banging out 5kms every day at top speed you're only going to wear out your body and risk injury, especially if your sneakers aren't up to the task.

Along with the right kind of training, you need the right kind of support. Running sneakers must have a certain degree of cushioning, this way it takes some of the pounding impacts off the body. According to experts, we experience a vertical force of 3-4 times our body weight during a run, meaning the more cushioning that's there, the less chance there is of sustaining an injury. The Pegasus 37s feature new forefoot Zoom Air bag technology meaning that they offer more rebound and energy when your foot connects with the ground during a run.

I first noticed the difference airbag tech makes when I was doing a hill sprint session from my program. The Air Zoom Pegasus 37 was super responsive even though it felt lightweight. The Nike React foam around the midsole makes the shoe feel soft and springy so when I was running on my toes it almost propelled me forward. Usually, after each run, I'd notice some twinges and tenderness in my feet, but I haven't experienced that while training in the Pegasus 37s.

I also noticed my leg muscles were far less sore when I'd train in my 37s compared to my previous sneakers. I could tell that the additional cushioning was absorbing the impact from my runs, especially when I switched terrain from asphalt to dirt.

My run program consisted of a variety of runs from the Nike Run Club app including fartlek runs (a single run where your shift between a fast and slow-paced without stopping), hill sessions (yep, dreaded hill sprints) and longer, slower recovery runs. As well as bodyweight training, strength and yoga sessions that each complemented my runs by strengthening the right muscle groups and aiding in my recovery. Each workout was under an hour and we're easy to fit into my Winter workout schedule, especially in isolation.

Between the personalised running program and the Pegasus 37s, I ended up smashing my 5km PB at the end of the four weeks. I've also grown to love running even more and now understand why runners cycle through sneakers so often. If you're going to pound the pavement you need a shoe that's going to show up as ready to train as you are. If you're a runner, I highly recommend investing in the Air Zoom Pegasus 37s, you'll be pleasantly surprised at how much they change your stride for the better.

Scroll to shop Nike's Air Zoom Pegasus 37s.


from POPSUGAR Health & Fitness https://ift.tt/30smbWe
via babu31

Boris Johnson: could he really be a champion for public health?

The United Kingdom’s response to the COVID-19 pandemic has been widely critiqued and even Prime Minister Boris Johnson has acknowledged that it could have been handled “differently”. However, perhaps, Australia has something to learn from at least some of Johnson’s public health initiatives? That’s the suggestion from Jane Martin, Executive […]

from Croakey https://ift.tt/2XlGLp6
via babu31

Kayla Itsines Announces New Zero Equipment Workout Program, and Offt, I Can Feel the Burn Already

Over the last six months, we've been forced to look for practical ways to workout from home with minimal equipment, space and time. We've swapped gyms and pilates studios for indoor workouts, virtual classes and zoom training sessions in the hopes of staying fit and healthy during isolation.

Now, Kayla Itsines, has released a fresh 16-week equipment free program (which includes 4 beginner weeks) to make working out at home that much easier. Featuring upper-body, lower-body, full-body and ab workouts that have been specifically designed to require zero equipment, this new program can all be done using just the space of your yoga mat.

Each week, you'll have six new resistance workouts to choose from meaning you can create a workout plan to fit in with your schedule. The program offers 70 new exercises that have never been included in BBG workouts before, and you can choose a workout style that suits you - including circuit, express, original BBG circuit, plus new bootcamp workouts.

According to BBG founder and SWEAT trainer, Kayla Itsines, the program is designed to assist women in improving their fitness levels, functional movement, core stability and strength. "Talking and listening to many women around the world in the past few months, I understand the many complexities and barriers that women are facing to exercise during this time," said Kayla. "It can be daunting not having access to a gym and having to workout at home without equipment whilst trying to juggle the pressures of living and working."

The new 16-week no equipment workout is now available through the SWEAT app.

Scroll to watch Kayla's announcement video.


from POPSUGAR Health & Fitness https://ift.tt/2D7IibG
via babu31

Calling for patient and family voices to be at the forefront, and especially during the pandemic

Every week, a different guest tweeter takes charge of Croakey’s rotated, curated Twitter account, @WePublicHealth, and uses the account to cover specific health issues or events. During the week of 27 July, Susan Biggar – @susanbbiggar – covered the importance of patient-centred care and patient engagement, especially during the pandemic, […]

from Croakey https://ift.tt/2D8MJTD
via babu31

A Mother Runner Takes a Stretching Challenge


stretching challenge
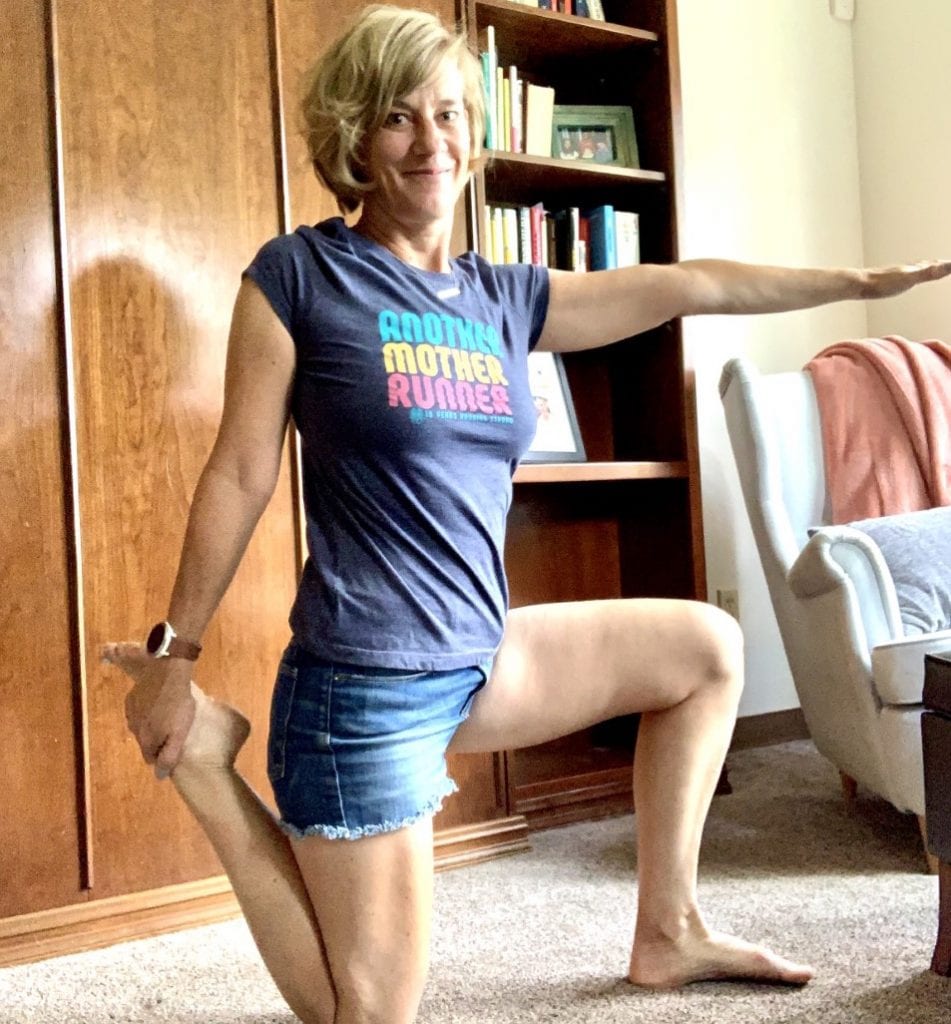
During this endless season of cancellations and time at home, I’ve had to look for new ways to entertain and challenge myself. Like many of you, I baked a lot of bread. I reorganized my closet, twice. I finished Netflix.

When one of my recent YouTube rabbit holes led to a video for a “Stretching Challenge,” I was intrigued. We runners aren’t widely known for doing the strength and after-care required to stay limber and injury-free. Also, my cranky, middle-age lady hips were begging for some attention.

I scrolled through several apps and settled on “30 Day Splits Challenge.”  (I didn’t plan on being able to do front splits in the next year, let alone in one month, but it was free and had good all-around stretches.) It would lead me through 30 days of stretches, giving me a little satisfactory checkmark next to each day I completed the routine. Each day lasted about 15-20 minutes, and I made a pact with myself: I would to the stretching challenge if could watch mindless TV as I limbered up.

stretching challenge
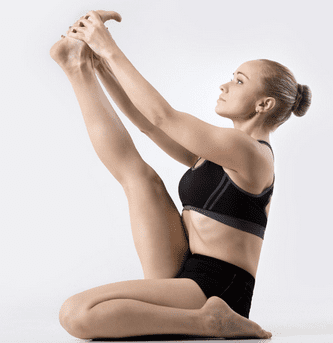
Day 1: After an easy warm-up, my first thought was, “This was a terrible mistake.” I didn’t know the Heron Pose was going to be a part of the routine. When that popped up, I had to stop everything, and Google Heron Pose images to confirm the actual position. There might have been some swearing while I attempted all kinds of nonsense to get my body to bend in a way that did not even remotely look like the woman in the picture. I was not off to a great start.

Day 6: I had to talk myself into stretching because the reality of how inflexible I had become over the years was disappointing. I usually do some calf stretches and call it good. This was much more intentional, much more time-consuming, and much more ambitious.

Day 11: I had hoped it would get better. It did and it didn’t. I swore less, but I still looked like a seal on a beach, trying to make its body do things that were better suited to an animal with more joints. I wasn’t as sore, but I still had trouble balancing and would tip over in the middle of a quad-stretch. A new low in my fitness journey.

Day 21: I had the sequence of stretches memorized and didn’t really need the app anymore, but I liked the little dings and appreciated the timer that kept me on task. I was more impressed with my consistency than the actual stretching. The Heron Pose—and the front splits—was never going to happen, but going through the routine and holding each stretch as best I could was a win in my book.

Day 25: I noticed some physical changes that made me happy. Touching my toes no longer felt tight. I felt—dare I say—flexible. My right hamstring that usually barked at the end of a long hike wasn’t as grouchy, and it didn’t take as much effort to hold each stretch the way it had on day one.

Day 30: Hallelujah! I made it. While I’m never going to be Cirque Du Soleil material, I was definitely more limber and none of the stretches (aside from, of course, my pal the Heron) felt difficult anymore. Repetition does have some rewards. Yay me!

My thoughts on a stretching challenge: I want to be the kind of person that will keep stretching every day. I’m returning to running after several months with a grouchy Achilles, and I have no doubt stretching helped. Even if I don’t stretch every day, a variety of stretches a few times a week will go a long way to making my body happy.

My thoughts on streak challenges: A good challenge can move you out of your comfort zone and help you flex that consistency muscle. During these days of uncertainty, it can be soothing to stick to a routine, even if it is just for a few weeks.

But if any kind of challenge brings you shame or utter frustration, let it go. Life is too short for that nonsense. That said, if you can successfully get into and hold a decent Heron—or shimmy on down to the splits—I am in awe.

 How flexible are you?

The post A Mother Runner Takes a Stretching Challenge appeared first on Another Mother Runner.


from Another Mother Runner https://ift.tt/3fuwRHY
via babu31