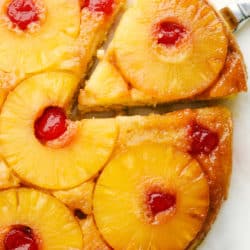
Perfect Pineapple Upside Down Cake is moist and fruity pineapple cake that is topped with delicious caramelized fruit. It’s no wonder this simple and easy made-from-scratch cake has been a tried and true favorite for years!
Also try Pineapple Upside Down Cupcakes which are a fun twist on the classic Pineapple Upside Down Cake! Or for a great pineapple taste that uses crushed pineapple, try Amazing Pineapple Cake!

Perfect Pineapple Upside Down Cake:
Family favorite Pineapple Upside Down Cake is a soft and moist cake with a sticky-sweet fruit layer. It is a great recipe for bakers who are looking for an easy but unique cake to make from scratch at home. The colorful fruit topping is simple but impressive to serve, and it is a classic dessert that you will not be able to get enough of!
The cake layer is moist and rich and the pineapple flavor explodes in every bite! Once flipped over, the brown sugar and butter topping drips down and coats the fruit. Then, the caramelized fruit soaks in to the cake and creates the most moist cake ever! It is a great recipe that you will make again and again because it is not only easy, but also delicious in every way!
Pineapple Cake Ingredients:
Canned pineapple and maraschino cherries are a couple of the no-fuss ingredients that will make this impressive, decadent dessert. These and a short list of other basic ingredients come together effortlessly to make an amazing treat your family and friends will go crazy over!
Topping:
- Brown sugar: Combine with melted butter and spread on the bottom of the baking dish.
- Butter: Melted to easily spread along the bottom of the pan.
Cake Ingredients:
- Pineapple: Sliced canned pineapple rings work great!
- Maraschino cherries: Sweet center of the pineapple that also adds great color!
- All purpose flour: Part of the cake batter that will give it good structure that will hold up to the fruit layer.
- Baking powder: Helps the batter rise.
- Salt: Added to cake batter to balance all of the sweetness.
- Butter:Softened to mix into the cake batter.
- Sugar: Part of any great dessert!
- Brown sugar: Measure it packed to get a rich sweet molasses flavor in the cake.
- Egg: Adds moisture and stability to the batter.
- Sour cream: Even more moisture!
- Milk: Adding milk to the batter makes the cake moist and soft.
- Pineapple juice: Great pineapple flavor throughout every bite.
Let’s Bake a Cake!
This buttery-rich homemade cake is topped with a baked fruit layer. It is incredibly delicious and easier than you think to make! The pineapple flavor is bursting throughout every single bite. A made from scratch cake has never been so easy!!
- Prep: Preheat oven to 350 degrees and grease a 9 inch cake pan.
- Make the topping: Combine the brown sugar and melted butter in a small bowl. Spread on the bottom of your 9 inch cake pan.
- Layer pineapple and cherries: Arrange the pineapple slices along the bottom of the pan and along the rim. Add cherries to the center of pineapple and in between pineapple slices.
- Mix together cake batter: In a medium sized mixing bowl combine the flour, baking powder and salt. In another medium sized mixing bowl with a hand mixer combine the softened butter and sugars and beat until incorporated. Add in the egg, sour cream, milk and pineapple juice and beat until just combined. Add in the flour mixture.
- Cover fruit with cake batter: Spread batter evenly on top of the prepared fruit covered pan.
- Bake: Place pan in the oven and bake for 30-35 minutes or until golden brown and toothpick inserted comes out clean.

The BEST Pineapple Upside Down Cake:
Classic recipes don’t have to be outdated. This recipe that has been around for generations is still as current and tasty as ever! A few pro tips will teach you how to finish off and store this unbelievably good dessert!
- Room temperature ingredients: Allow all ingredients to come to room temperature before combining them together to get the best mixture.
- Don’t grease the pan: Because you coat the bottom of the dish with butter, you do not need to grease the pan. The cake will slide right out when you flip it over at the end.
- Dry fruit: Pat the pineapple and cherry dry before pouring the batter over it. This is already a very moist cake and any extra moisture from the fruit will make it overly wet.
- When to flip the cake: Wait 10-15 minutes before flipping your cake over. Allowing it to cool first will make sure your cake stays together and does not fall apart when you flip it over. Try using a cooling rack or plate and placing it over the cake before turning the pan over.
- Storing: Pineapple upside down cake is best served fresh. Storing can cause the cake to get too mushy due to the moisture from the fruit. For best results when storing, let the cake cool completely, then wrap it tightly and refrigerate for 2-3 days or freeze for about 1 month.
- Reheating: To reheat in the oven, cover it with foil and bake at 350 degrees for about 5 minutes or until heated throughout.

Do You Eat Pineapple Upside Down Cake Warm?
This soft, simple dessert can be served warm or cold. Either way, the pineapple flavor will be light and tasty. If you serve it warm, top it with vanilla ice cream for amazing combination. To reheat a frozen or refrigerated cake, simply cover it with aluminum foil and place in the oven until it is warm throughout. Or, enjoy pineapple upside down cake as a cool and refreshing treat, and serve it right out of the refrigerator!

More Fruity Cake Recipes:
- Homemade Strawberry Cake
- Pineapple Cheesecake Cake
- Strawberry Pound Cake
- Banana Cake with Cream Cheese Frosting
- Strawberry Lemonade Cake
Perfect Pineapple Upside Down Cake
Ingredients
Topping:
- 1/2 cup brown sugar
- 1/4 cup butter melted
Cake Ingredients:
- 1 20 ounce can pineapple sliced
- 12 maraschino cherries
- 1 and 1/3 cup all purpose flour
- 1 teaspoon baking powder
- 1/2 teaspoon salt
- 1/4 cup butter softened
- 1/2 cup sugar
- 1/4 cup brown sugar packed
- 1 large egg
- 1/4 cup sour cream
- 1/4 cup milk
- 1/4 cup pineapple juice
Instructions
-
Preheat oven to 350 degrees and grease a 9 inch cake pan. To make the topping combine the brown sugar and melted butter in a small bowl. Spread on the bottom of your 9 inch cake pan. Arrange the pineapple slices along the bottom of the pan and along the rim. Add cherries to the center of pineapple and in between pineapple slices.
-
In a medium sized mixing bowl combine the flour, baking powder and salt. In another medium sized mixing bowl with a hand mixer combine the softened butter and sugars and beat until incorporated. Add in the egg, sour cream, milk and pineapple juice and beat until just combined. Add in the flour mixture.
-
Spread evenly on top of the prepared pan. Bake for 30-35 minutes or until golden brown and toothpick inserted comes out clean.
Nutrition
from The Recipe Critic https://ift.tt/3f0UVSF
via babu31blog
 Daniel’s Grandma Pauline died last Wednesday. She had such a big, beautiful personality and I loved her very much. I’m ...